Custom Proxy Server
When a technician connects to a remote device, the system tries to establish a direct P2P connection between the two sides using the WebRTC protocol. However, due to network limitations on either side, a direct connection is not always possible. In such cases, the system uses proxy servers to ensure that the technician can reliably connect to the remote device.
File Manager
Proxy servers are also actively used in file transfer connection mode. Learn more about the file manager in the separate guide.
Proxy Server Types
Default
The SaaS version of our system uses several proxy servers distributed across different regions to provide better ping and faster transfer of heavy video traffic and files from the Agent application on the remote device to the technician’s browser. However, even though these servers are geographically distributed, their resources are limited and may become busy depending on user activity.
Custom
In addition to the shared default proxy servers, our system allows you to deploy individual proxy servers for a specific team. This helps you set up a stable and secure connection to your devices that does not depend on the overall system load.
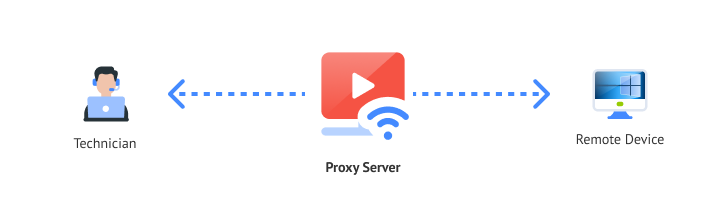
How the Proxy Server Works
A proxy server acts as an intermediary between the Agent application on the remote device and the technician’s browser. When a remote session is established, the Agent application connects to the proxy server and sends media data or files to it. At the same time, the technician’s browser also connects to the same proxy server and receives the data sent by the Agent application. In this way, the proxy server transfers data between the participants of the connection.
To allow the Agent application and the browser to connect to the proxy, it supports two channels:
- WebRTC — in this mode, the proxy runs a standard TURN server within the WebRTC protocol.
- WebSocket — in this mode, the proxy runs a web server available over the HTTPS protocol.
The technician chooses which channel to use in the settings on the device card or in the connection panel. If you configure only one channel in the custom proxy, the technician will not have a choice.
Data Transfer Channel
Learn more about data transfer channels in the Screen Image Quality and Screen Control Features guides.
How to Set Up a Custom Proxy Server
Installing the Gateway
To deploy your own proxy server, you need to use the Gateway application. It has a special operating mode that allows it to work as a proxy server.

Download and install the Gateway application on a dedicated virtual server that will become your personal proxy server. Choose a virtual server with the best possible network conditions for communication with both the remote device and the technician’s device.
Gateway Installation Guide
Learn more about the installation process in the What is Gateway App? guide.
System Requirements
The following minimum system requirements are recommended for the proxy server:
- RAM: 2 GB
- CPU: 2 cores
- Disk: 16 GB
- Bandwidth: up to 100 Mbps
Network Requirements for the WebRTC Channel
A static IP address is not required for the server, but the server must be reachable by IP address from other network participants: the main server, the technician’s browser, and the Agent application. You will also need to open ports for incoming TCP and UDP connections. See more the section below.
Network Requirements for the WebSocket Channel
You will need a static IP address for the server, a domain name, an SSL certificate, and port 443 open for incoming TCP connections. See more the section below.
Gateway Configuration
Linking the Gateway to Your Account
After installing the Gateway application on a dedicated virtual server, you need to link it to your account on the main Getscreen.me server.
To do this, go to your personal account, open Settings, and then go to the Gateways page. Create a new gateway profile with any name you like. After creating it, open the gateway card and download the config.json file from the Installation and Launch tab.
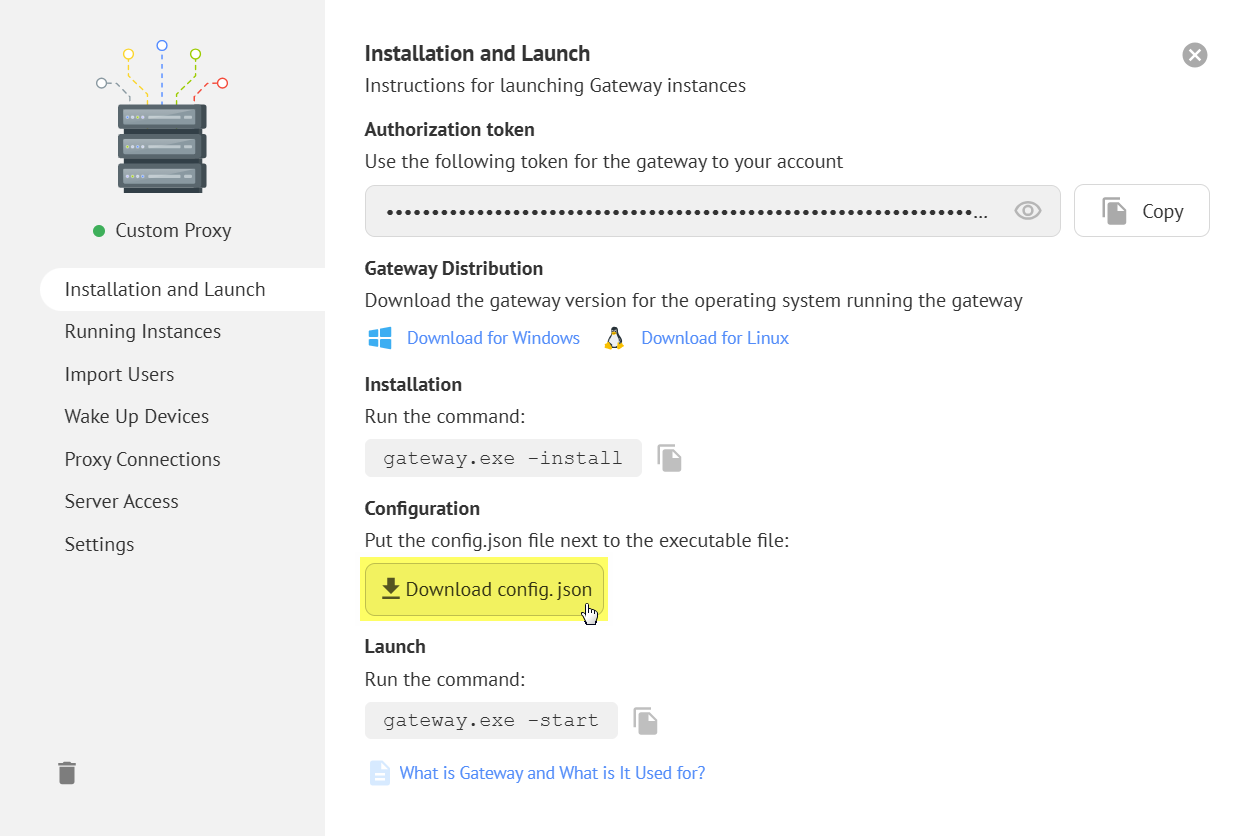
This file is already filled with the required data. Place it on the dedicated server next to the gateway executable file. Below is an example and description of the parameters used to connect to the server:
| Parameter | Type | Description |
|---|---|---|
server.host | string | Server address. Default: getscreen.me |
server.token | string | Authorization token. |
server.secure | boolean | Connect only to servers with a valid SSL certificate. Default: true. |
Configuration File Example
Next, start the Gateway using the following command:
After the Gateway starts, the application log should contain a line similar to the one below. It means that the Gateway has successfully connected to the Getscreen.me server:
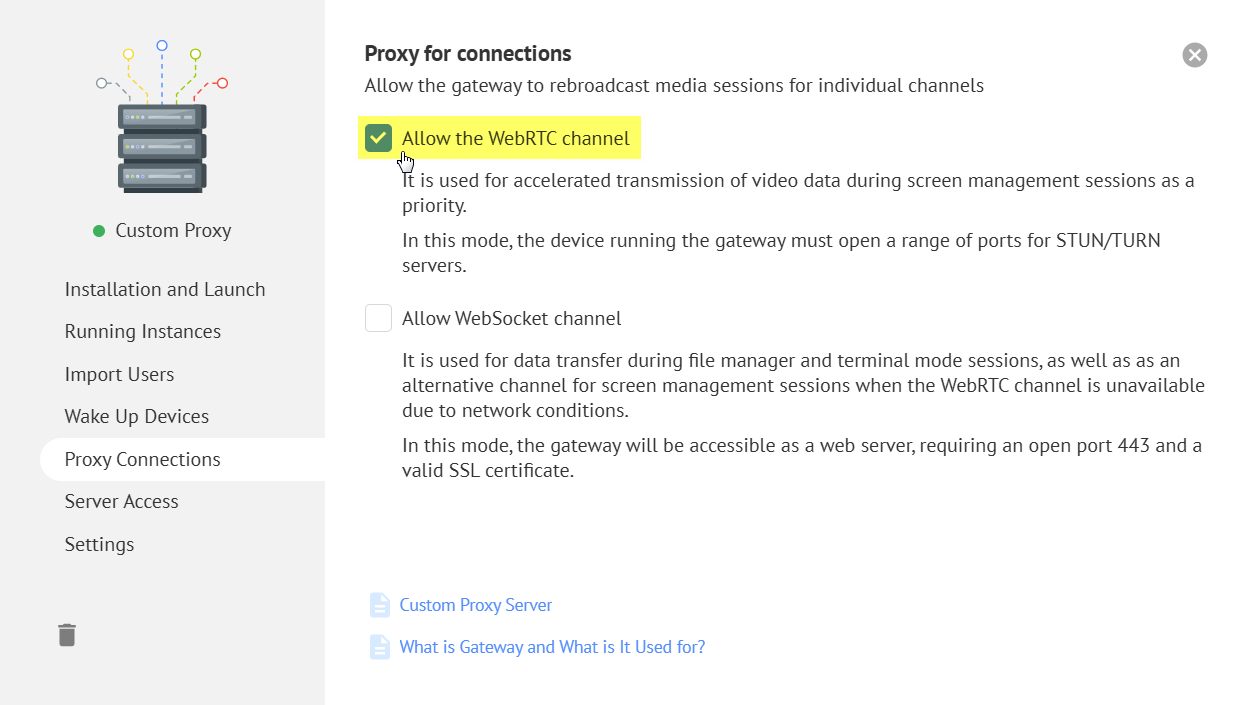
Setting Up the WebRTC Channel for the Proxy
To enable the WebRTC channel on the proxy server, open the gateway profile in your personal account, go to the Proxy Connections tab, and select Allow WebRTC Channel:
If you want to customize the TURN server settings, you can specify additional parameters in the proxy.webrtc section of the config.json file.
You can find all available parameters in the table below:
| Parameter | Type | Description |
|---|---|---|
proxy.webrtc.public_ip | string | Public IP address |
proxy.webrtc.listen_ip | string | Internal IP address for listening for incoming connections |
proxy.webrtc.port | number | Port for listening for incoming TCP connections. Default: 3478. |
proxy.webrtc.udp_ports_max | number | Maximum port in the range for listening for incoming UDP connections. Default: 60000 |
proxy.webrtc.udp_ports_min | number | Minimum port in the range for listening for incoming UDP connections. Default: 40000 |
Example
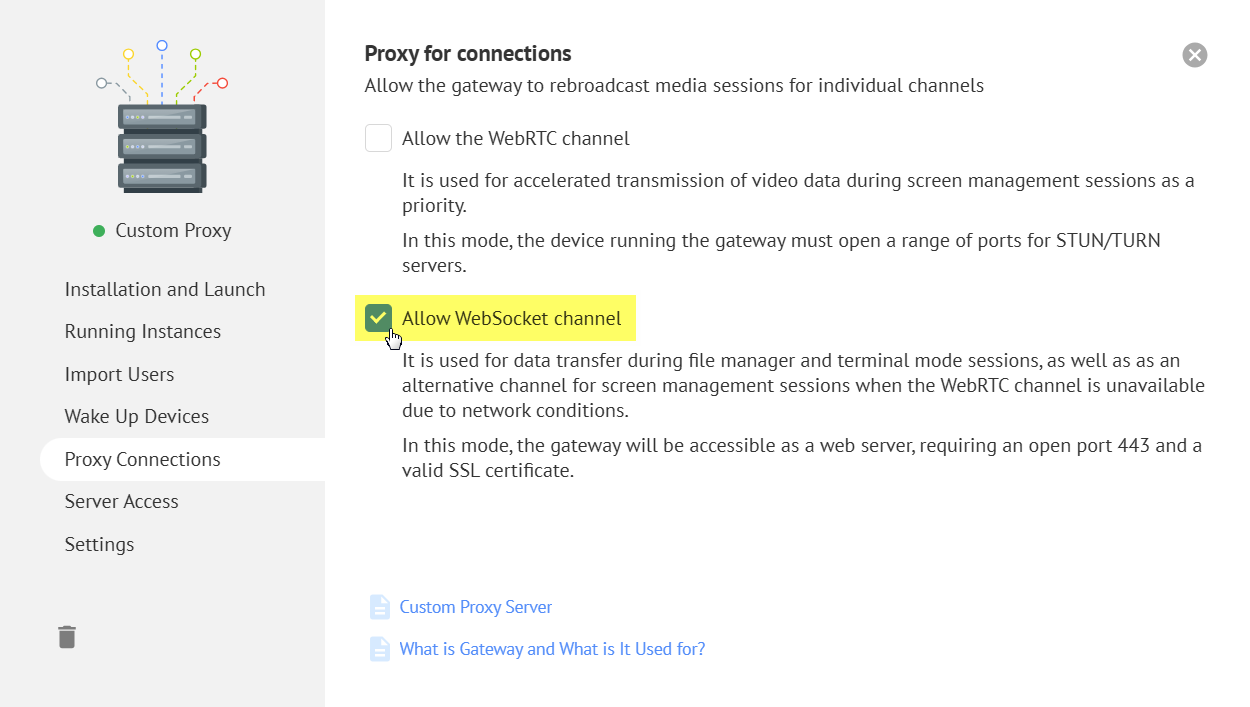
Setting Up the WebSocket Channel for the Proxy
To enable the WebSocket channel on the proxy server, open the gateway profile in your personal account, go to the Proxy Connections tab, and select Allow WebSocket Channel:
Then, in config.json, specify the domain name where your proxy web server will be available in the proxy.websocket.host field.
You can also specify other custom settings from the table below:
| Parameter | Type | Description |
|---|---|---|
proxy.websocket.host | string | Domain name where the Gateway will be available and for which the SSL certificate is issued |
proxy.websocket.listen_ip | string | IP address for listening for incoming connections. Default: 0.0.0.0 |
proxy.websocket.port | number | Port for listening for incoming connections. Default: 443 |
Example
Domain Name
You need to add an A record in the DNS settings of your domain provider with the public IP address of your server as its value. For convenience, you can use a subdomain.
Next, issue an SSL certificate for the selected domain name and place the certificate and private key files in the cert folder next to config.json. The files must be named server.crt and server.key.
SSL Certificate
You can issue a certificate using the free certificate authority Let’s Encrypt .
If everything is configured correctly, you will see a line like this when opening the root page of your domain name over HTTPS:
Forced Use
By default, configured custom proxy servers are not guaranteed to be used for all your connections. They are added as an extra option to the existing shared default proxy servers, but only for your account. If the system determines that your custom proxy server is the best option, it will be used. Otherwise, the shared default proxy will be used.
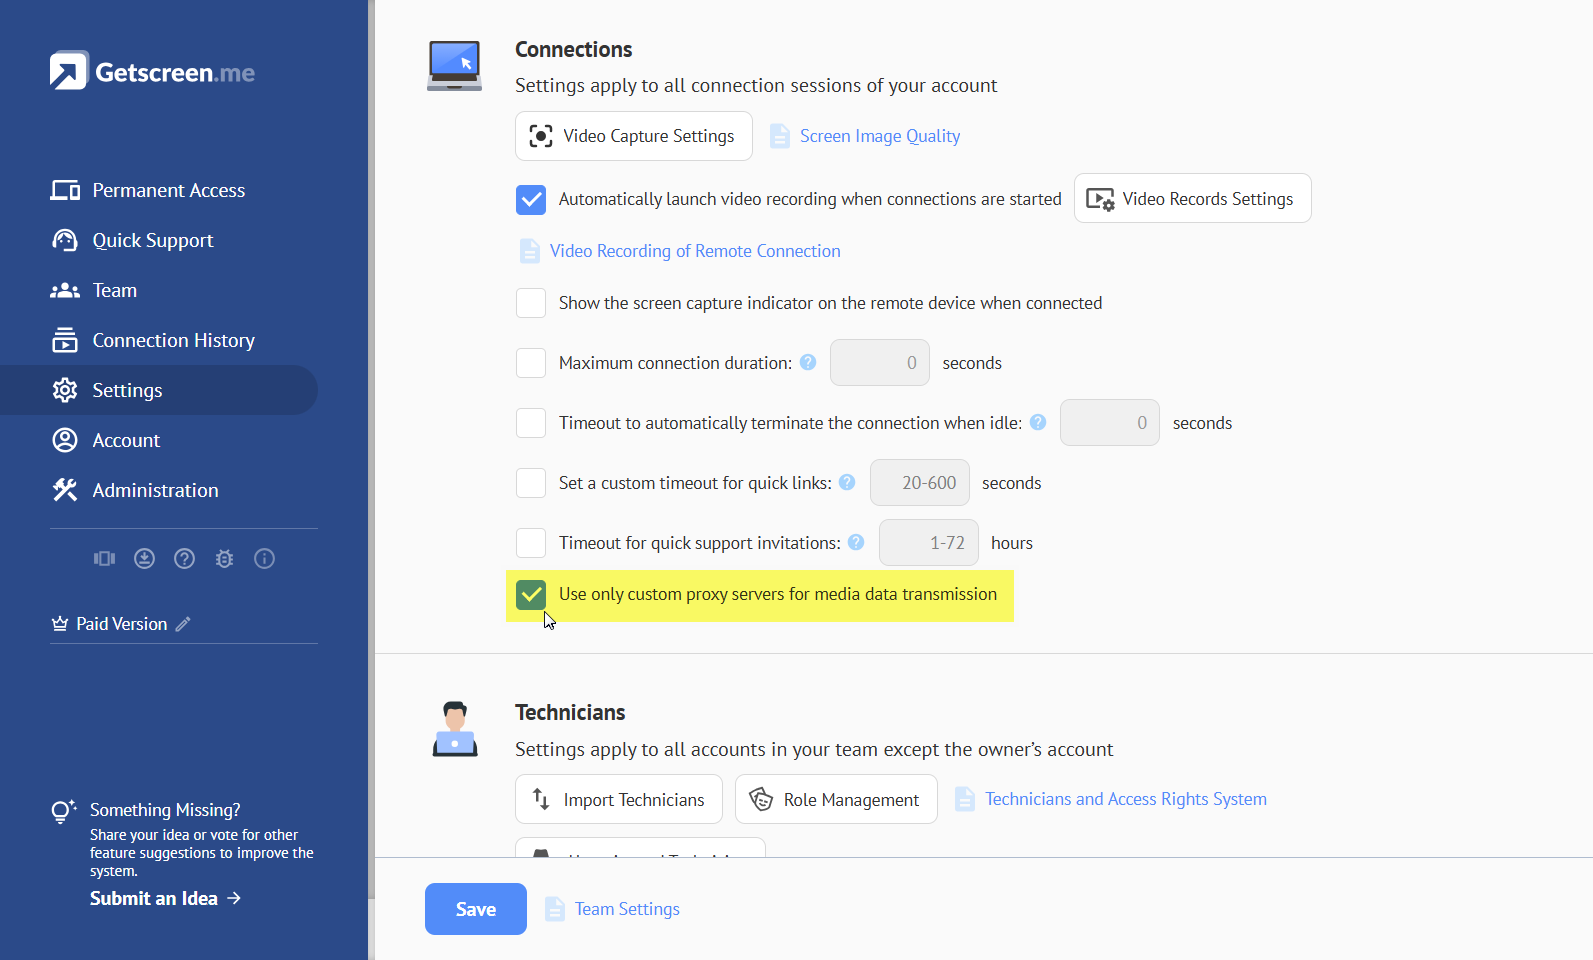
To make the system use only your custom proxy servers, you can enable forced use. In Settings, open the Team tab and select Use only custom proxy servers for media data transmission:
Self-Maintenance
When you force the system to use only your own custom proxy servers, you are fully responsible for maintaining them and keeping them available. Make sure to monitor resource usage and the availability of your proxy servers.
Preparing the Agent Application
The proxy server is selected on the Agent application side when a connection is established, meaning it is selected from the remote device side.
To let the Agent application detect the new proxy server, you need to restart it. This means that after completing all the custom server setup steps described above, you must restart the Agent application on your remote devices.
Checking Availability and Usage
To make sure your custom proxy server is being used during a connection, connect to a remote device, switch to the WebSocket channel in the signal management window, and check the Proxy field. It should show the domain name of your proxy server.
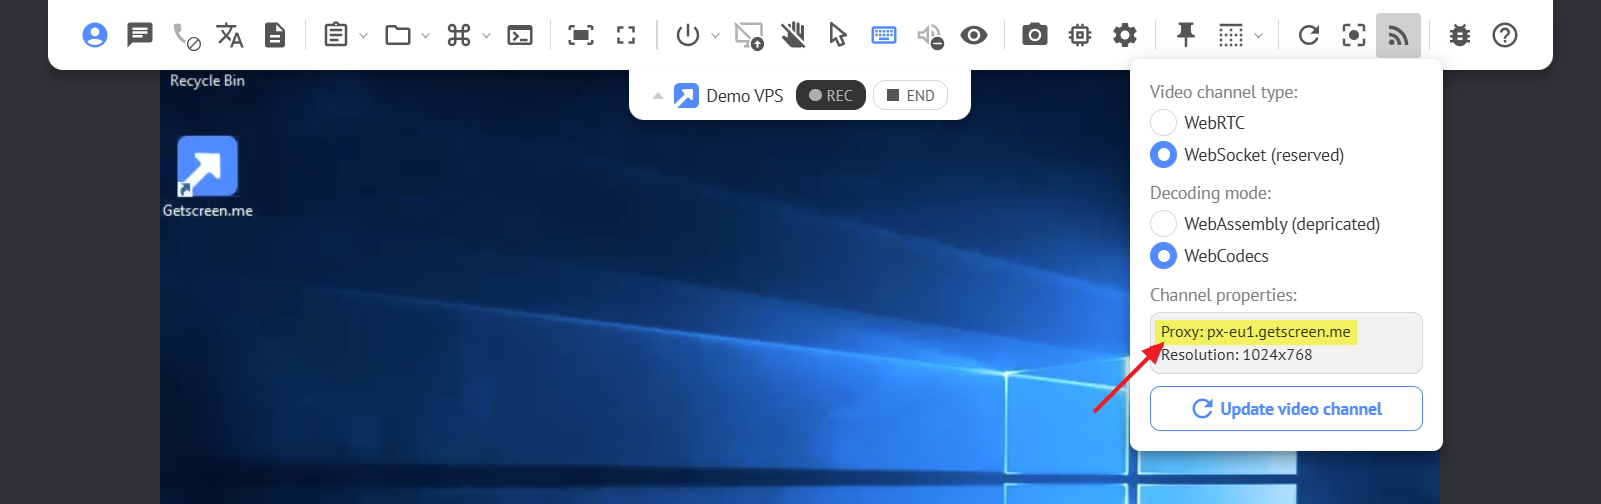
If you are using the WebRTC channel and a P2P connection is unavailable, a TURN proxy server will be used. In the Proxy field, you will see the IP address of your proxy server.